Posts

Using No-IP DDNS without using DUC in Mikrotik

Image
Way to update No-IP DDNS without running the DUC (Dynamic Update Client) software on a computer.Using built-in router setting or script based solutions   is often preferred for 24/7 reliability.   For a MikroTik router, the way to handle this without using the No-IP DUC software: a  native script   (best for No-IP users).   1. Using a No-IP Script (Native RouterOS Method) Since MikroTik doesn't have a simple "No-IP" checkbox in most versions, you use a script to tell the router to update your IP.   Step A: Create the Script Open  WinBox  and go to  System > Scripts . Click  +  and name it  no-ip_update . Paste this code (replacing the placeholders with your info): =========================================== :local noipuser "YOUR_EMAIL_OR_USERNAME" :local noippass "YOUR_PASSWORD" :local noiphost "YOUR_HOSTNAME.ddns.net" :local cIP [/ip cloud get public-address] :if ([:resolve $noiphost] != $cIP) do={     /tool fetch...

Came out from Cave.. now doing Starlink Installation..

Image
For so long I never update my blog and kind of rusty already.. like an abandoned case full of bats and spider web 😂  I just want to share my thought after 2 site starlink installation .. A bit challenging at the first place..as you know.. need to climb rooftop for a nice clear blue skies..Felt really old enough for this kind of job.. but life must go on..  A nice and simple setup actually as you need some basic wifi setting as all hardware is just like plug and play.. As for my Starlink kits it consist of a Actuated Dish , Wifi Router , Ethernet adapter and cables.. The location as you can see is on top of a cabin.. a clear view of the skies is a must or else will be interrupted intermittently due to signal blockage by roof or below metal shade. the minimum speed I can get is around 250+- Mbps.. Just good enough for small office transaction and others googling stuff or maybe some movie. Below is some videos and picture for you guys to see..
Image
Malaysia Telco Tower ( Will be updated time after time )  1BestariNet Receiver Integrated System -1BRIS ( YES Tower ) Digi Tower  

Converting Aruba IAP ( IAP )to Campus AP ( CAP )

 1. You need to console the AP 2. Hit <Enter> to stop autoboot:  2 3. Purgeenv  ( to remove config and make a default config ) 4. factory_reset ( to reset all config and setting ) 5. reset   ( reboot AP ) 6. Wait until AP rebooted and User and Password appear 7. User : admin Password : AP Serial Number 8. If ask you change password please change to your desirable password 9. Type # convert-aos-ap CAP < Controller IP > 10.Converting to Controller based AP. Will automatically reboot when done 11.Make sure the AP got an IP from the Controller ( After reboot inside CLI ) 12.Check AP inside controller once 2 LED is static. #EOF p/s : Tested on IAP 325 Model.

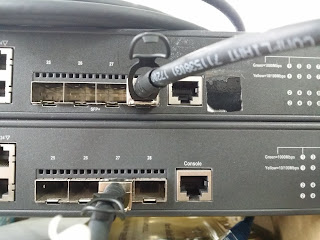
This is how I stacking my 2 switches with IRF using 1 DAC cable

Image
This is how I stacking my 2 switches with IRF using 1 cable   How to configure it? ==================== Switch 1 -------- # irf member 1 priority 32 # int  Ten-GigabitEthernet 1/0/27 shutdown # irf-port 1/1 port group interface Ten-GigabitEthernet 1/0/27 # int  Ten-GigabitEthernet 1/0/27 undo shutdown # irf-port-configuration active # quit # save # ============== Switch 2 --------- # irf member 1 renumber 2 # Save # Reboot *Switch UP  # irf member 2 priority 1 # # int  Ten-GigabitEthernet 2/0/28 shutdown # irf-port 1/1 port group interface Ten-GigabitEthernet 2/0/28 # int  Ten-GigabitEthernet 2/0/28 undo shutdown # irf-port-configuration active # quit # save # * Switch rebooted by itself and will follow configuration from Main Switch 1 Result/Output from 2 Switches ============================= #display  irf link Member 1  IRF Port  Interface                            ...

Configure Aruba AP-303H ( RW ) Unified AP

Image
Requirement :- 1.AP-CBL-SERU,JY728A Serial Cable ( Driver at this link https://support.arubanetworks.com/ToolsResources/tabid/76/DMXModule/514/EntryId/4229/Default.aspx ) 2.Putty ( Download at https://www.chiark.greenend.org.uk/~sgtatham/putty/latest.html ) How to configure ? First step :- Connect console cable and also Connected to POE injector Second :- Open Putty and follow this command as shown in the picture.This to empty / reset the configuration to factory default Third :- Configure like below command Hope this will help you.. -=EOT=-

How To install PL2303 Serial USB on OSX

Its been a long time never updating this blog.As for starter for this 2019 blogging.I show you how to install a PL2303 Serial Cable on Mac.  Installing the kext file can be done in a few easy steps: download and extract $ cd /path/to/osx-pl2303.kext $ sudo cp -R osx-pl2303.kext /System/Library/Extensions/  next you need to fix permissions and execute bits: $ cd /System/Library/Extensions  $ sudo chmod -R 755 osx-pl2303.kext  $ sudo chown -R root:wheel osx-pl2303.kext load the module and update kernel boot caches  $ cd /System/Library/Extensions  $ sudo kextload ./osx-pl2303.kext  $ sudo kextcache -system-cache  For deinstallation, perform these steps:  $ sudo rm -rf /System/Library/Extensions/osx-pl2303.kext  $ sudo kextcache -system-cache Driver Link: http://www.xbsd.nl/pub/osx-pl2303.kext.tgz    Credit to : xbsd.nl ( http://www.xbsd.nl/2011/07/pl2303-serial-usb-on-osx-lion.html )

How to connect YES 4G in Linux

1) Go to https://www.yes.my/v3/support/download.do#go 2) Select on which OS version e.g Connect for Linux (Ubuntu 12 & 14) 32 bit / 64 bit  3) Download it 4) Once downloaded,find the downloaded file and right click the filename Connect_Installer_32 and select Open with Ubuntu Software Center. 5) Click Install 6) And you got your 4G Yes dialer. p/s : It will ask your root password(Administrator password). And you done. --EOT-- 

Unable to Install LibreOffice.How to Solve it.

Error on Dependencies: The following packages have unmet dependencies:  libreoffice : Depends: libreoffice-core (= 1:3.5.7-0ubuntu7) but it is not going to be installed                Depends: libreoffice-writer but it is not going to be installed                Depends: libreoffice-calc but it is not going to be installed                Depends: libreoffice-impress but it is not going to be installed                Depends: libreoffice-draw but it is not going to be installed                Depends: libreoffice-math but it is not going to be installed                ...

How to Install w3af inside Ubuntu 12.04

I preferred w3af_console and below is the step taken:-   #git clone --depth 1 https://github.com/andresriancho/w3af.git   # cd w3af    #./w3af_console   --#--An error will occur as needed to install some dependencies--#---   ( " The framework has two different sets of dependencies, one for the GUI and one for the Console, in case you don’t want to use the GUI, just run w3af_console and install those dependencies. " )   $sudo apt-get install libyaml-dev python2.7-dev   $cd /tmp/ $./w3af_dependency_install.sh You now can start to use w3af. #EOT

How to install Wapiti (The web-application vulnerability scanner)

 Requirements wapiti-2.3.0.tar.gz python-setuptools Download $ wget http://wapiti.sourceforge.net/ Extract $ tar -zxvf wapiti-2.3.0.tar.gz -C /opt/ **Depends on which folder you prefer Installation /opt/wapiti-2.3.0# python setup.py install Error in Installation Traceback (most recent call last):   File "setup.py", line 2, in     from setuptools import setup, find_packages ImportError: No module named setuptools ** Please install python-setuptools to correct this error.       $ sudo apt-get install python-setuptools #EOT

Just a Simple Setup Diagram for VPN with TM Unifi.

Image

How to Install New Nmap 6.40 for Ubuntu 12.04

Damn ...After a long night, now I can installed my new Nmap v6.40 on my Ubuntu 12.04.(Error causing by Ncat) Below is the way to install it. wget http://nmap.org/dist/nmap-6.40.tar.bz2 tar -jxvf nmap-6.40.tar.bz2 cd nmap-6.40 ./configure make "LUA_LIBS=../liblua/liblua.a -ldl -lm" make install

How to recover files in Ubuntu 12.04 LTS

It came across to me when I tried to recovered some of my files last night.I googling and I found such simple way of recovering files.Maybe some of you got other ways and you also can share it with me here too. The software called photorec aka testdisk. 1)Just install via #apt-get install testdisk 2)To run the app #photorec /d restore 3)Select the partition and filesystem. For Selection of filename, choose  "File Opt" in the Menu section and tick ( X ) Then click " Enter " - it will return to the Main Menu Then please select " Search " and press Enter and the process of recovering will be done... --EOT--

#MH 370

 MH 370 WE NEVER LOOSE HOPE. WE  KEEP PRAYING 4 YOU..!  PLEASE COME BACK..!!!

The Syria documentary film "Not Anymore: A Story of Revolution" by Matthew VanDyke

Image

GNOME Sound Conversion. - SoungConverter. Easy to use.

Click the link below to  Review and Download. SoundConverter Also can download via Ubuntu Software Center and Apt-get. Happy trying..

Cisco PIX : How to allow HQ via ISP Network going thru your LAN (branch) network.

The HQ is connected to the PIX site through the ISPs network. The HQ network should be 10.22.x.x/yy. On the basis of your above PIX configuration this should be located behind the "outside" interface of the PIX. For your HQ coming from subnet 10.22.x.x/yy to subnet 10.45.x.0/19 you would have to configure NAT0 between these networks. Essentially the configuration would look something like this access-list INSIDE-NAT0 remark NAT0/NONAT for Branch to HQ traffic access-list INSIDE-NAT0 permit ip 10.45.x.0 255.255.224.0 10.22.x.x y.y.y.y nat (inside) 0 access-list INSIDE-NAT0 This should essentially enable hosts from 10.22.x.x/yy subnet to connect directly to subnet 10.45.x.0/19 on their original IP addresses. * If the other Branch network needs the same type of rule then you would simply add another line to the ACL/access-list we created BUT you would use the other Branch network as the source. access-list INSIDE-NAT0 permit ip 10.36.0.0 255.255.0.0...

How to configure Multiple Internal network in Pix/ASA 7.x

Just Click the link to view on how to configure multiple Internal network in Pix/ASA 7.x Pix/ASA 7.x Multiple Internal network Configuration

Pidgin Log Files on Linux

The location is as below. /home/systemUserName/.purple/logs/yahoo/myYahooId/* If you have others it will listed after /logs/